Blog posts are pasted and referred to here for discussions, want to comment on a specific post? Feel free to voice your feelings on the forum!
Full blog post for quotes
Proxmox is a free and open operating system based on Debian Linux that provides a web-based interface to manage virtual machines (KVM) and containers (LXC) on a single server or a cluster of servers. It has grown rapidly in popularity by those with home servers and businesses alike. In fact, NetBird uses Proxmox almost daily for testing and development.
In this article we are going to cover the basics of getting Proxmox up and running, setting up a LXC container with NetBird for remote connectivity, and diving into some more advanced tips and tricks such as setting up a ZFS pool and enabling IOMMU for GPU passthrough.
Installing Proxmox
You’ll need a computer/server that will act as your node with at least 2GB RAM (4GB+ recommended), 32GB+ storage space (SSD recommended), an 8GB+ USB drive, stable internet connection, and another computer to create the bootable USB.
Download Proxmox VE ISO
Visit the official Proxmox website at Download Proxmox software, datasheets, agreements and download the latest Proxmox VE ISO file. You can verify the checksum if desired to ensure file integrity.
Create Bootable USB Drive
Using Rufus (Windows): Download Rufus from https://rufus.ie/ , insert your USB drive, and launch Rufus as Administrator. Select your USB drive as the device, click “SELECT” to choose the Proxmox ISO, set the partition scheme to GPT, then click “START” and wait for completion.
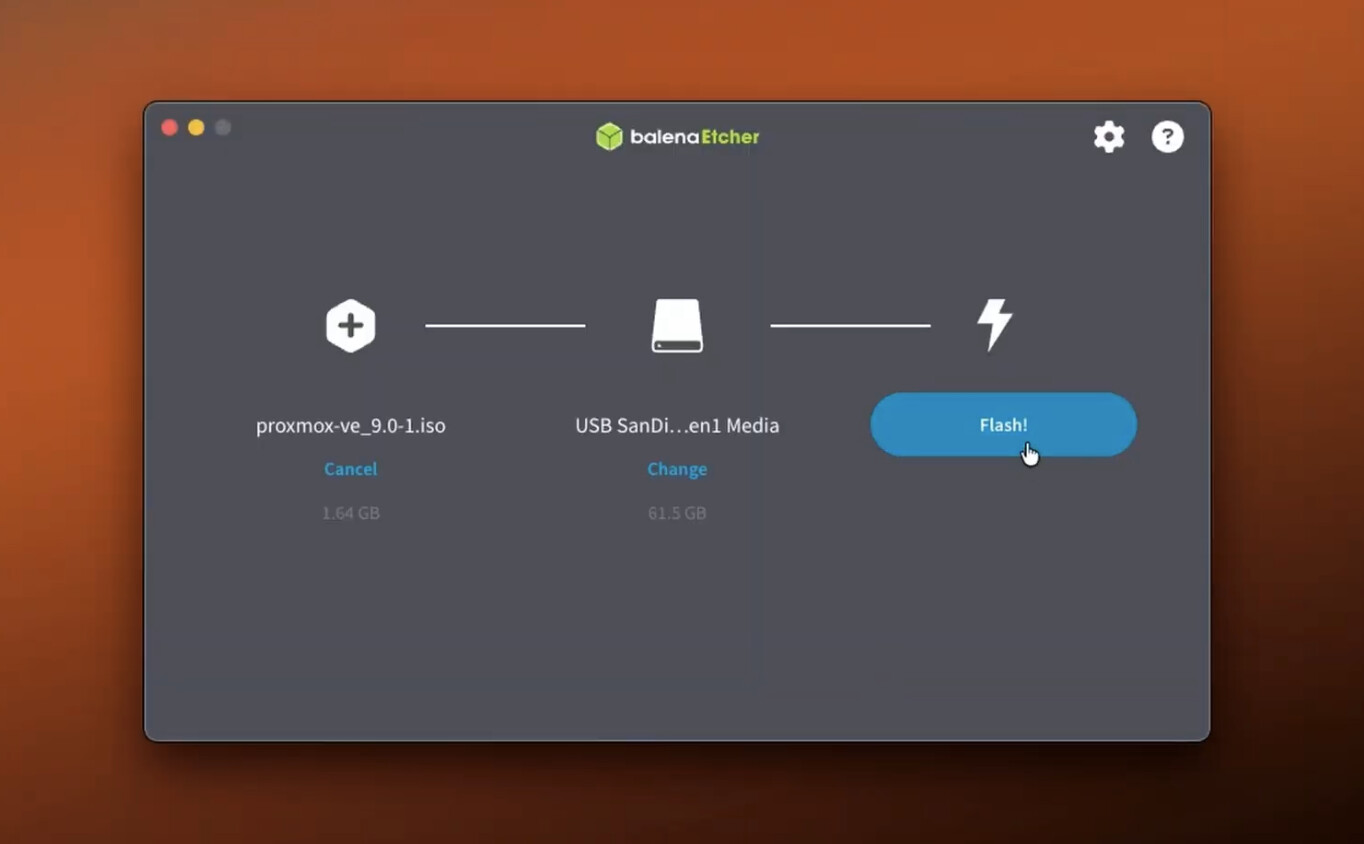
Using Balena Etcher (Cross-platform): Download Balena Etcher from balenaEtcher - Flash OS images to SD cards & USB drives , install and launch it, click “Flash from file” to select the Proxmox ISO, click “Select target” to choose your USB drive, then click “Flash!” and wait for the process to complete.
Boot from USB
Enter BIOS/UEFI setup by pressing F2, F12, Delete, or ESC during boot (the exact key varies by manufacturer, so watch for boot messages showing the correct key). In the BIOS settings, disable Secure Boot if present and set the USB drive as the first boot priority.
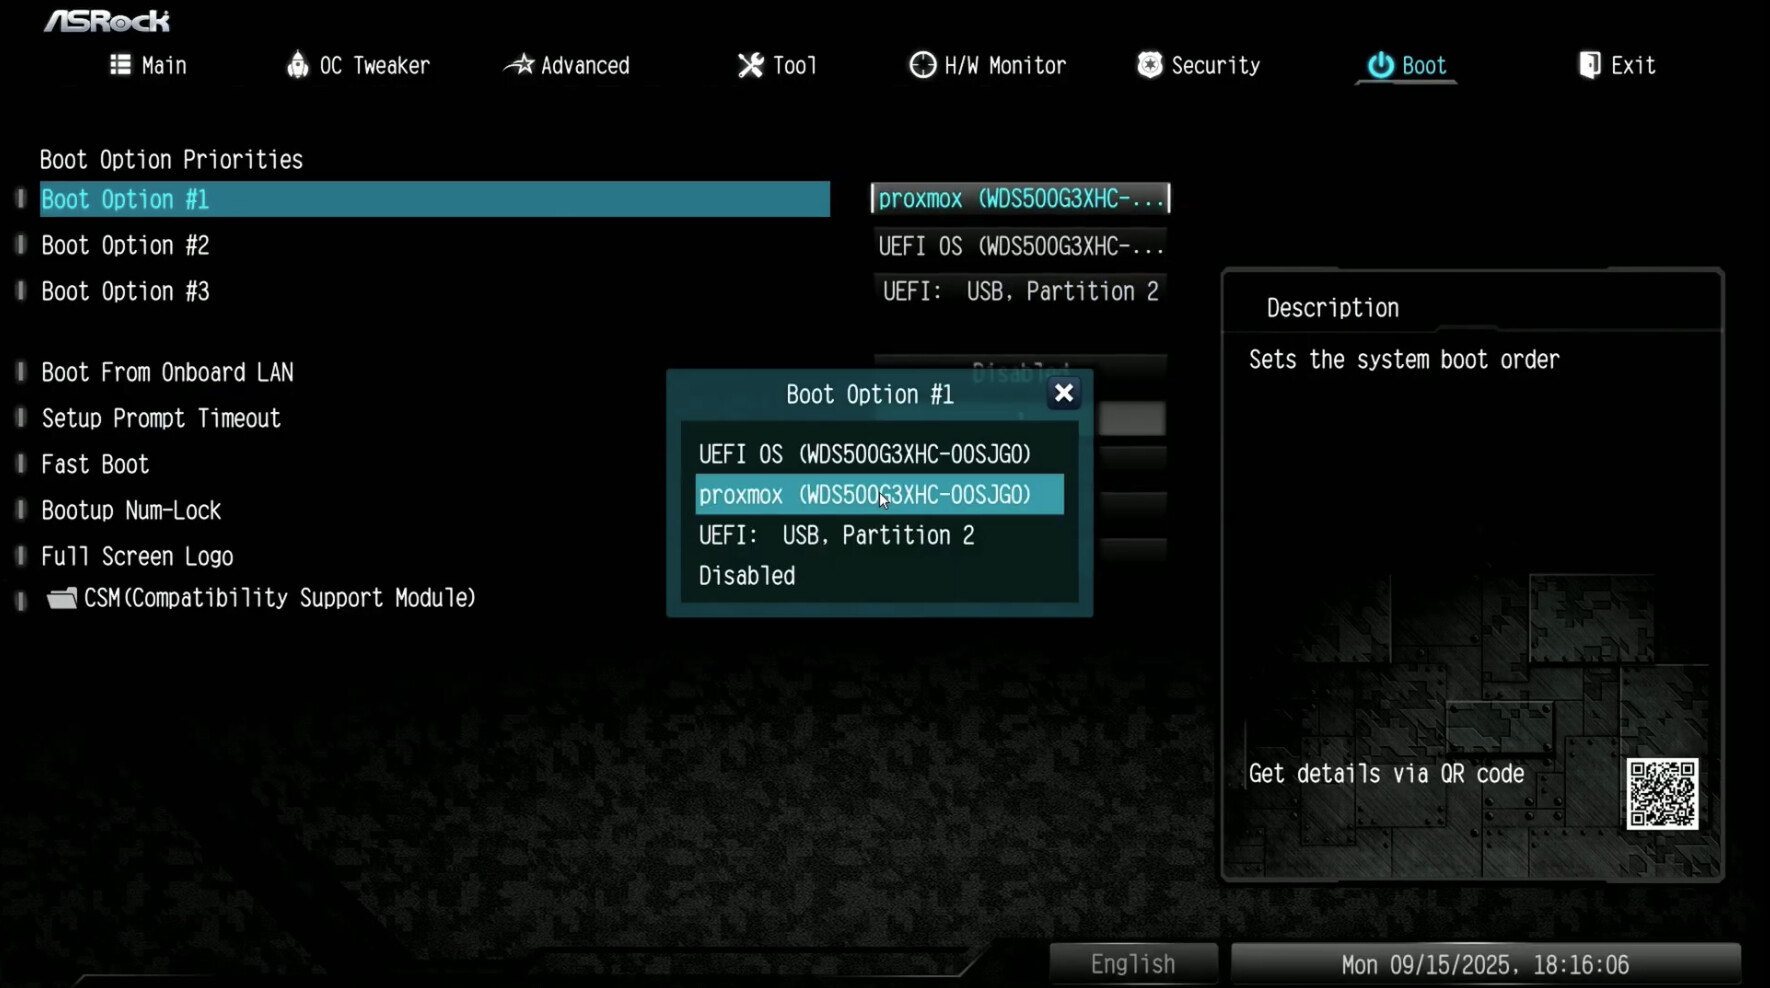
Save settings and exit, then the system should boot to the Proxmox VE installer.
Proxmox VE Installation
When the boot screen appears, select “Install Proxmox VE” and press Enter to continue. Read and accept the End User License Agreement by clicking “I agree”.
For the target hard disk selection, choose your installation drive (note that this will erase all data on the selected drive). If you click “Options” for advanced settings, you can choose between ZFS (recommended) or ext4 (simpler) filesystems. For ZFS, you can select RAID levels like RAID1 for multiple drives or single for one drive, while ext4 uses standard partitioning. Swap size is usually auto-calculated but can be customized.
Next, select your country, time zone, and keyboard layout. Create a strong root password that you’ll use to log in, confirm it, and enter a valid email address for notifications.
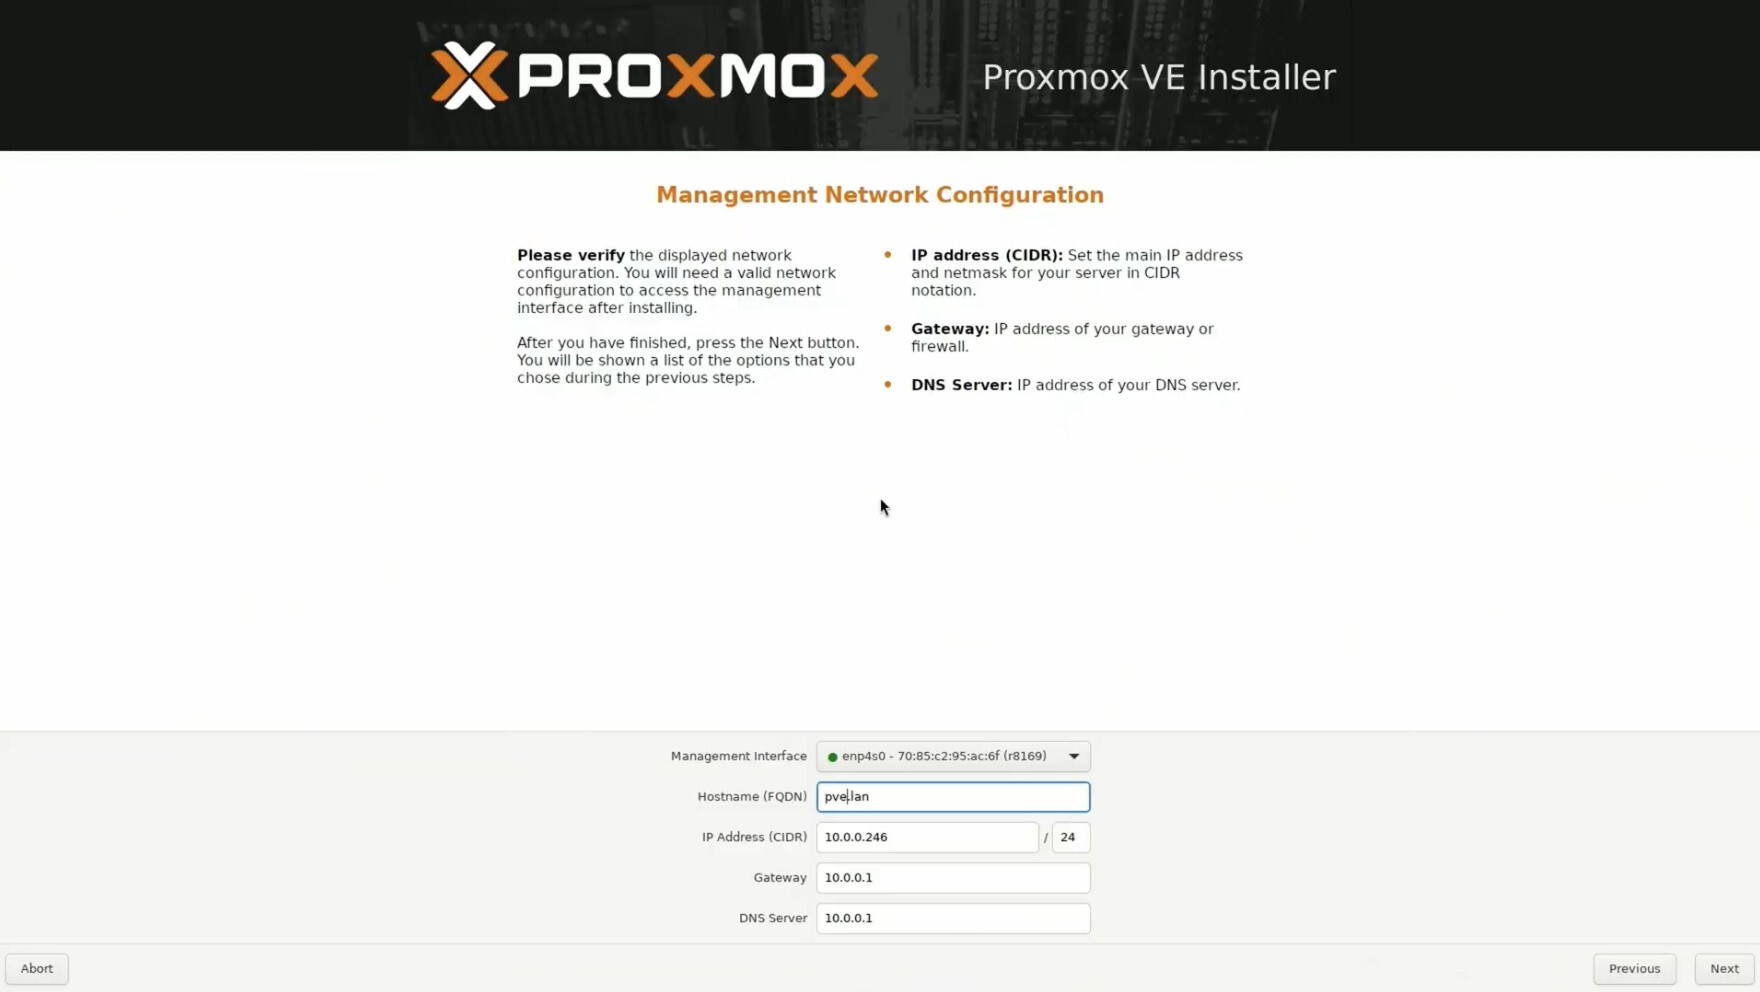
For management network configuration, the interface is usually auto-detected as eth0. Enter a hostname like proxmox.local. Choose between DHCP for automatic IP assignment (easier for beginners) or static IP for more control. If using static IP, enter values like 10.0.0.246/24 for IP address, your router’s IP (e.g., 10.0.0.1) for gateway, and your router or public DNS (e.g., 8.8.8.8) for DNS server.
Review all settings carefully in the installation summary, then click “Install” to begin the installation process.
First Boot and Login
When installation completes, remove the USB drive when prompted and click “Reboot” so the system restarts from the hard drive. During the first boot, you’ll see Linux boot messages, followed by a console login prompt, and the system will display network information including the IP address.
To access the web interface, open a web browser on another computer on the same network and navigate to https://YOUR-PROXMOX-IP:8006 (for example, https://10.0.0.246:8006). Accept the self-signed certificate security warning that appears. Log in using root as the username, the password you set during installation, and Linux PAM standard authentication as the realm.
You’ll see a subscription notice which is normal for home use - just click “OK” to continue.
Post-Install Steps
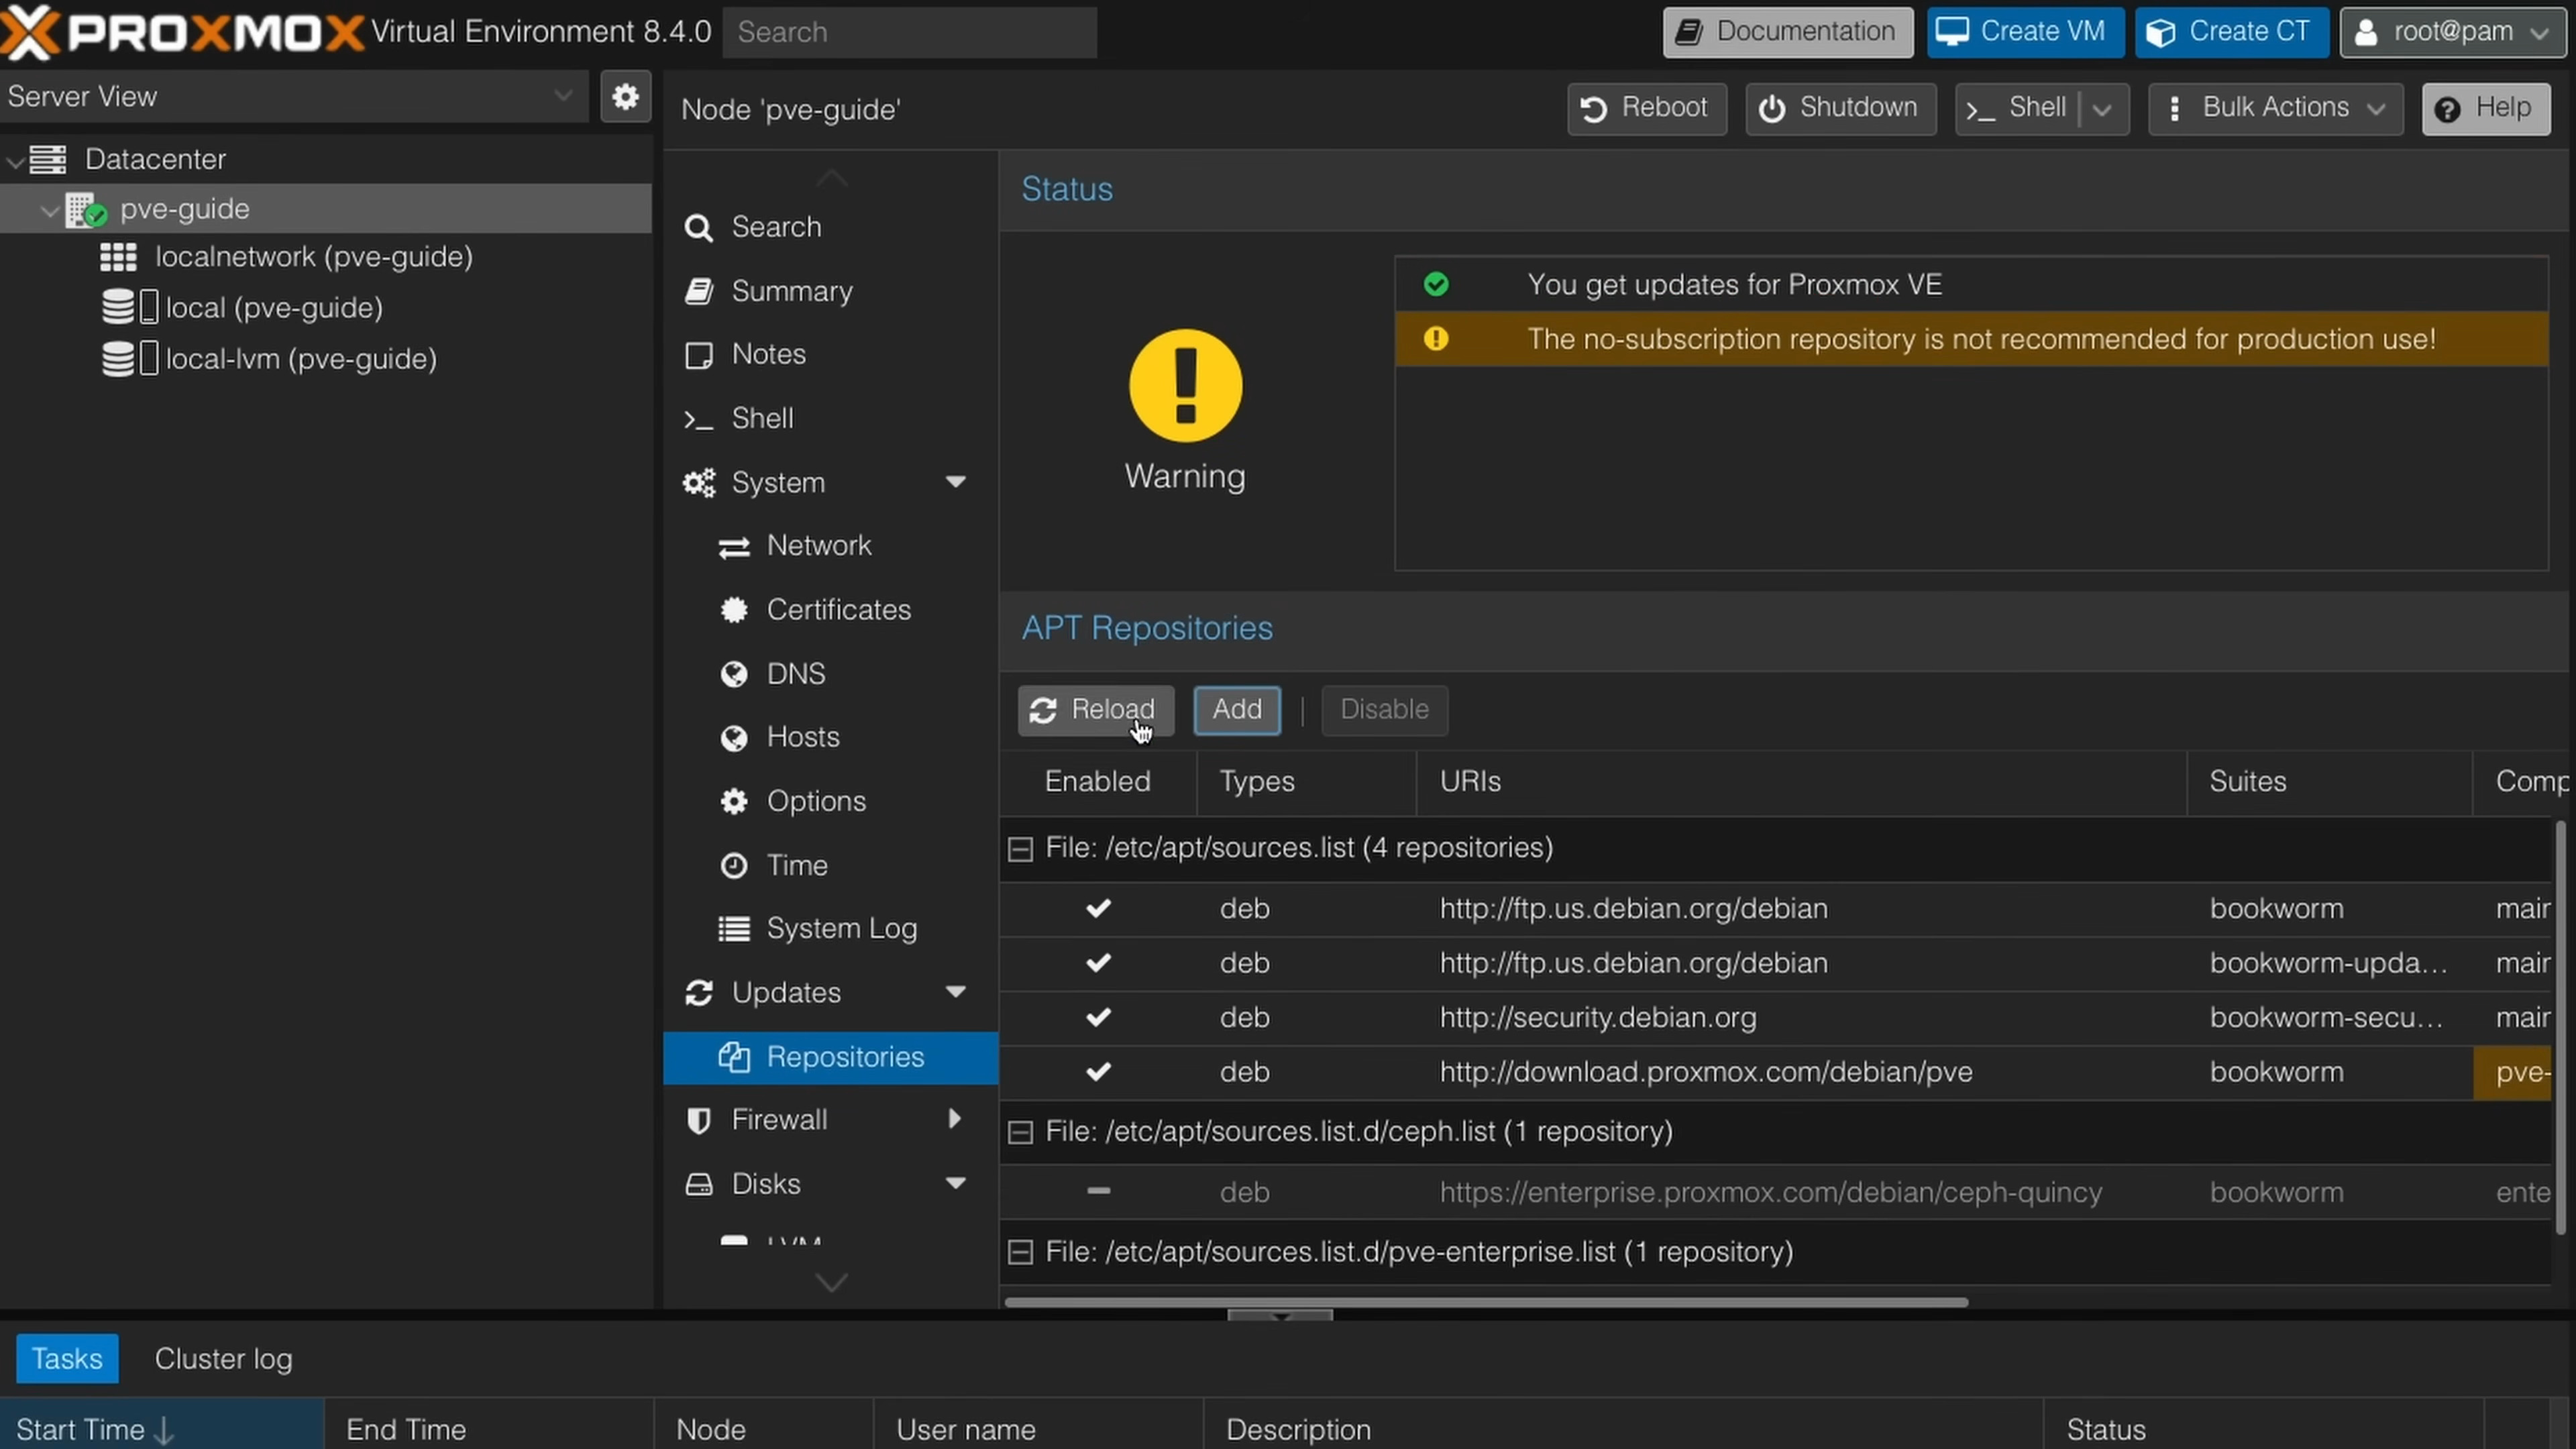
Disable Enterprise Repositories
- Navigate to Node > Repositories. Disable the enterprise repositories.
- Now click Add and enable the no-subscription repository. Finally, go to Updates > Refresh.
- Upgrade your system by clicking Upgrade above the repository settings page.
Delete local-lvm and Resize local (read warning)
Warning: This assumes a fresh installation without advanced storage settings during the installation, such as ZFS. These steps are only recommended if you have a small boot drive and you need to reclaim space.
The boot drive in this machine is small and I run all my containers and virtual machine disks on a separate storage pool. So the LVM partition is not necessary for me and goes unused. If you’re running everything off the same boot drive for fast storage, skip this. Also, you should check out this video to learn more about LVM before doing anything.
- Delete local-lvm manually from web interface under Datacenter > Storage.
- Run the following commands within Node > Shell.
lvremove /dev/pve/data
lvresize -l +100%FREE /dev/pve/root
resize2fs /dev/mapper/pve-root
Check to ensure your local storage partition is using all available space. Reassign storage for containers and VM if needed.
Ensure IOMMU is enabled
IOMMU will need to be enabled within the BIOS on your system. Each motherboard manufacturer has a slightly different layout, but in general AMD motherboards will have the setting under AMD CBS and NBIO Settings and Intel boards will have it under VT-d under the CPU options.
Enable IOMMU in grub configuration within Node > Shell.
nano /etc/default/grub
You will see the line with GRUB_CMDLINE_LINUX_DEFAULT="quiet", all you need to do is add intel_iommu=on or amd_iommu=on depending on your chipset.
# Should look like this
GRUB_CMDLINE_LINUX_DEFAULT="quiet intel_iommu=on"
Next run the following commands and reboot your system.
update-grub
Now check to make sure everything is enabled.
dmesg | grep -e DMAR -e IOMMU
dmesg | grep 'remapping'
If you plan on using GPU passthrough with virtual machines or if you want to learn about enabling PCI Passthrough in general, check out their docs here .
Create ZFS Pools
In the video, I added two additional 4TB disk drives for more storage. Proxmox makes creating ZFS pools for your additional drives super easy and adding storage this way adds redundancy, so if a drive fails you have the opportunity to prevent data loss.
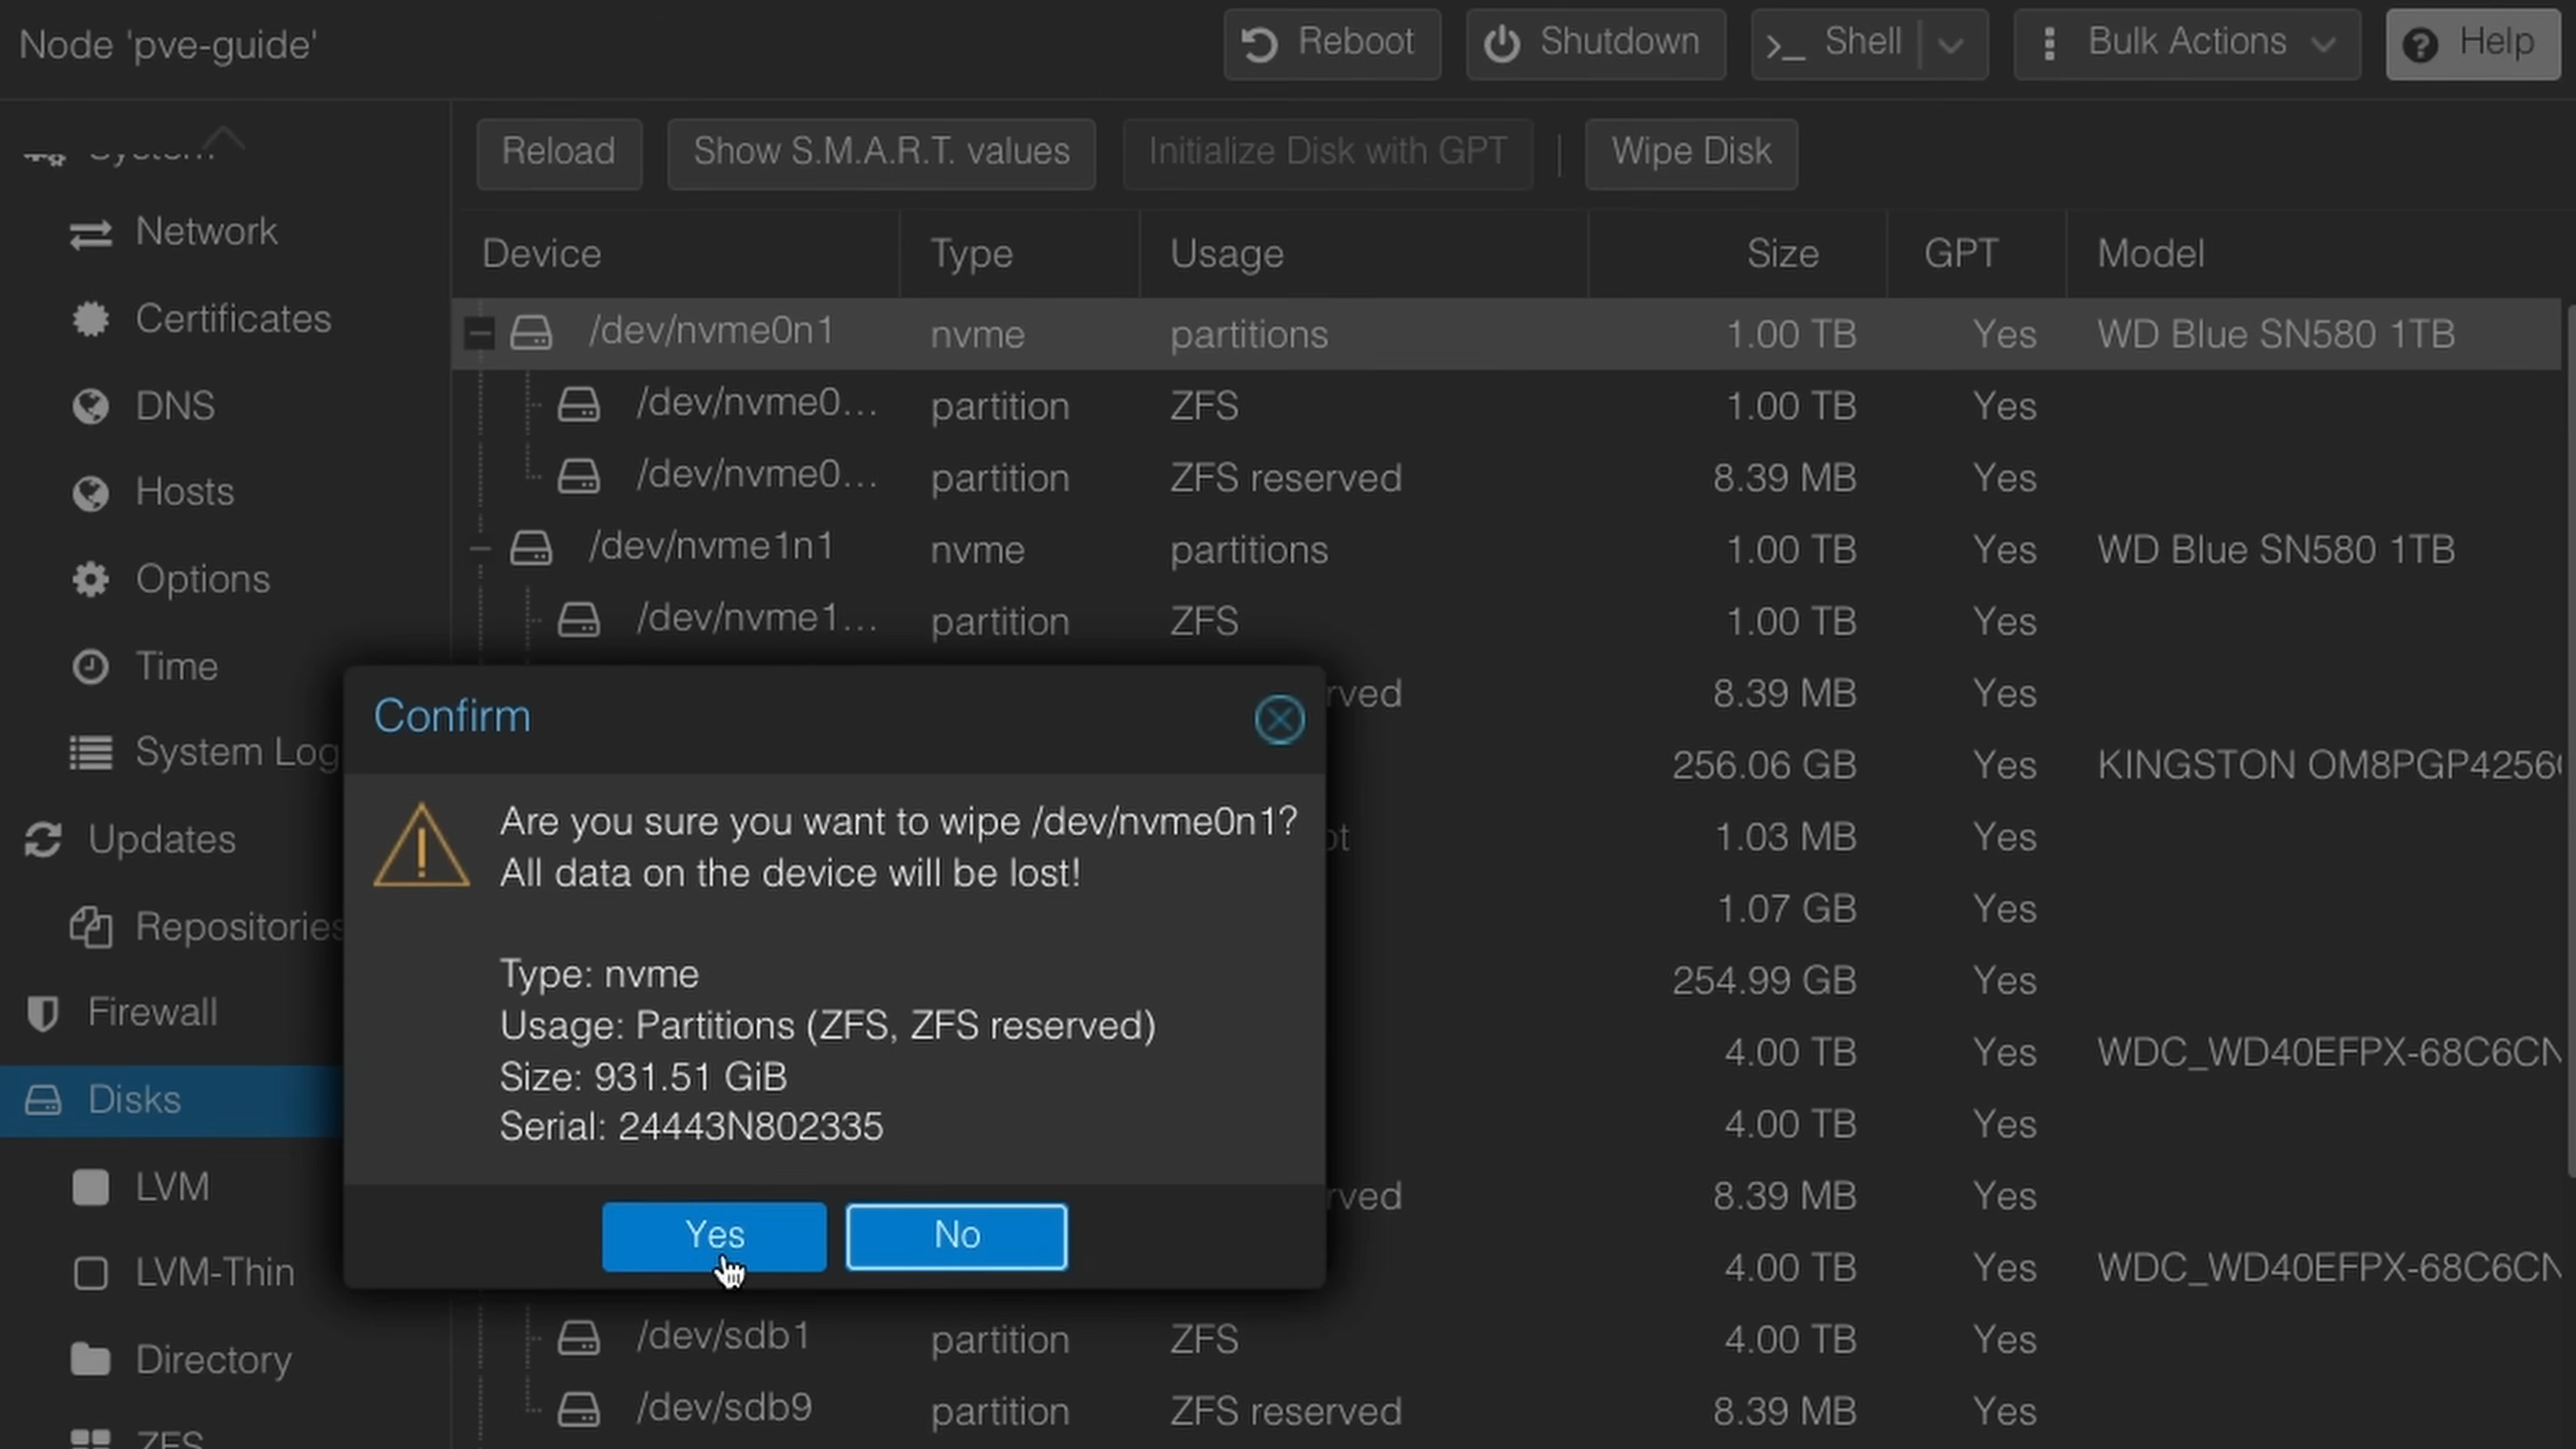
First, check out your disks and make sure that they’re all there. Find this under Node > Disks. Make sure you wipe all the disks you plan on using and do note this will wipe any data on the disks, so make sure there is no important data on them and back up if needed.
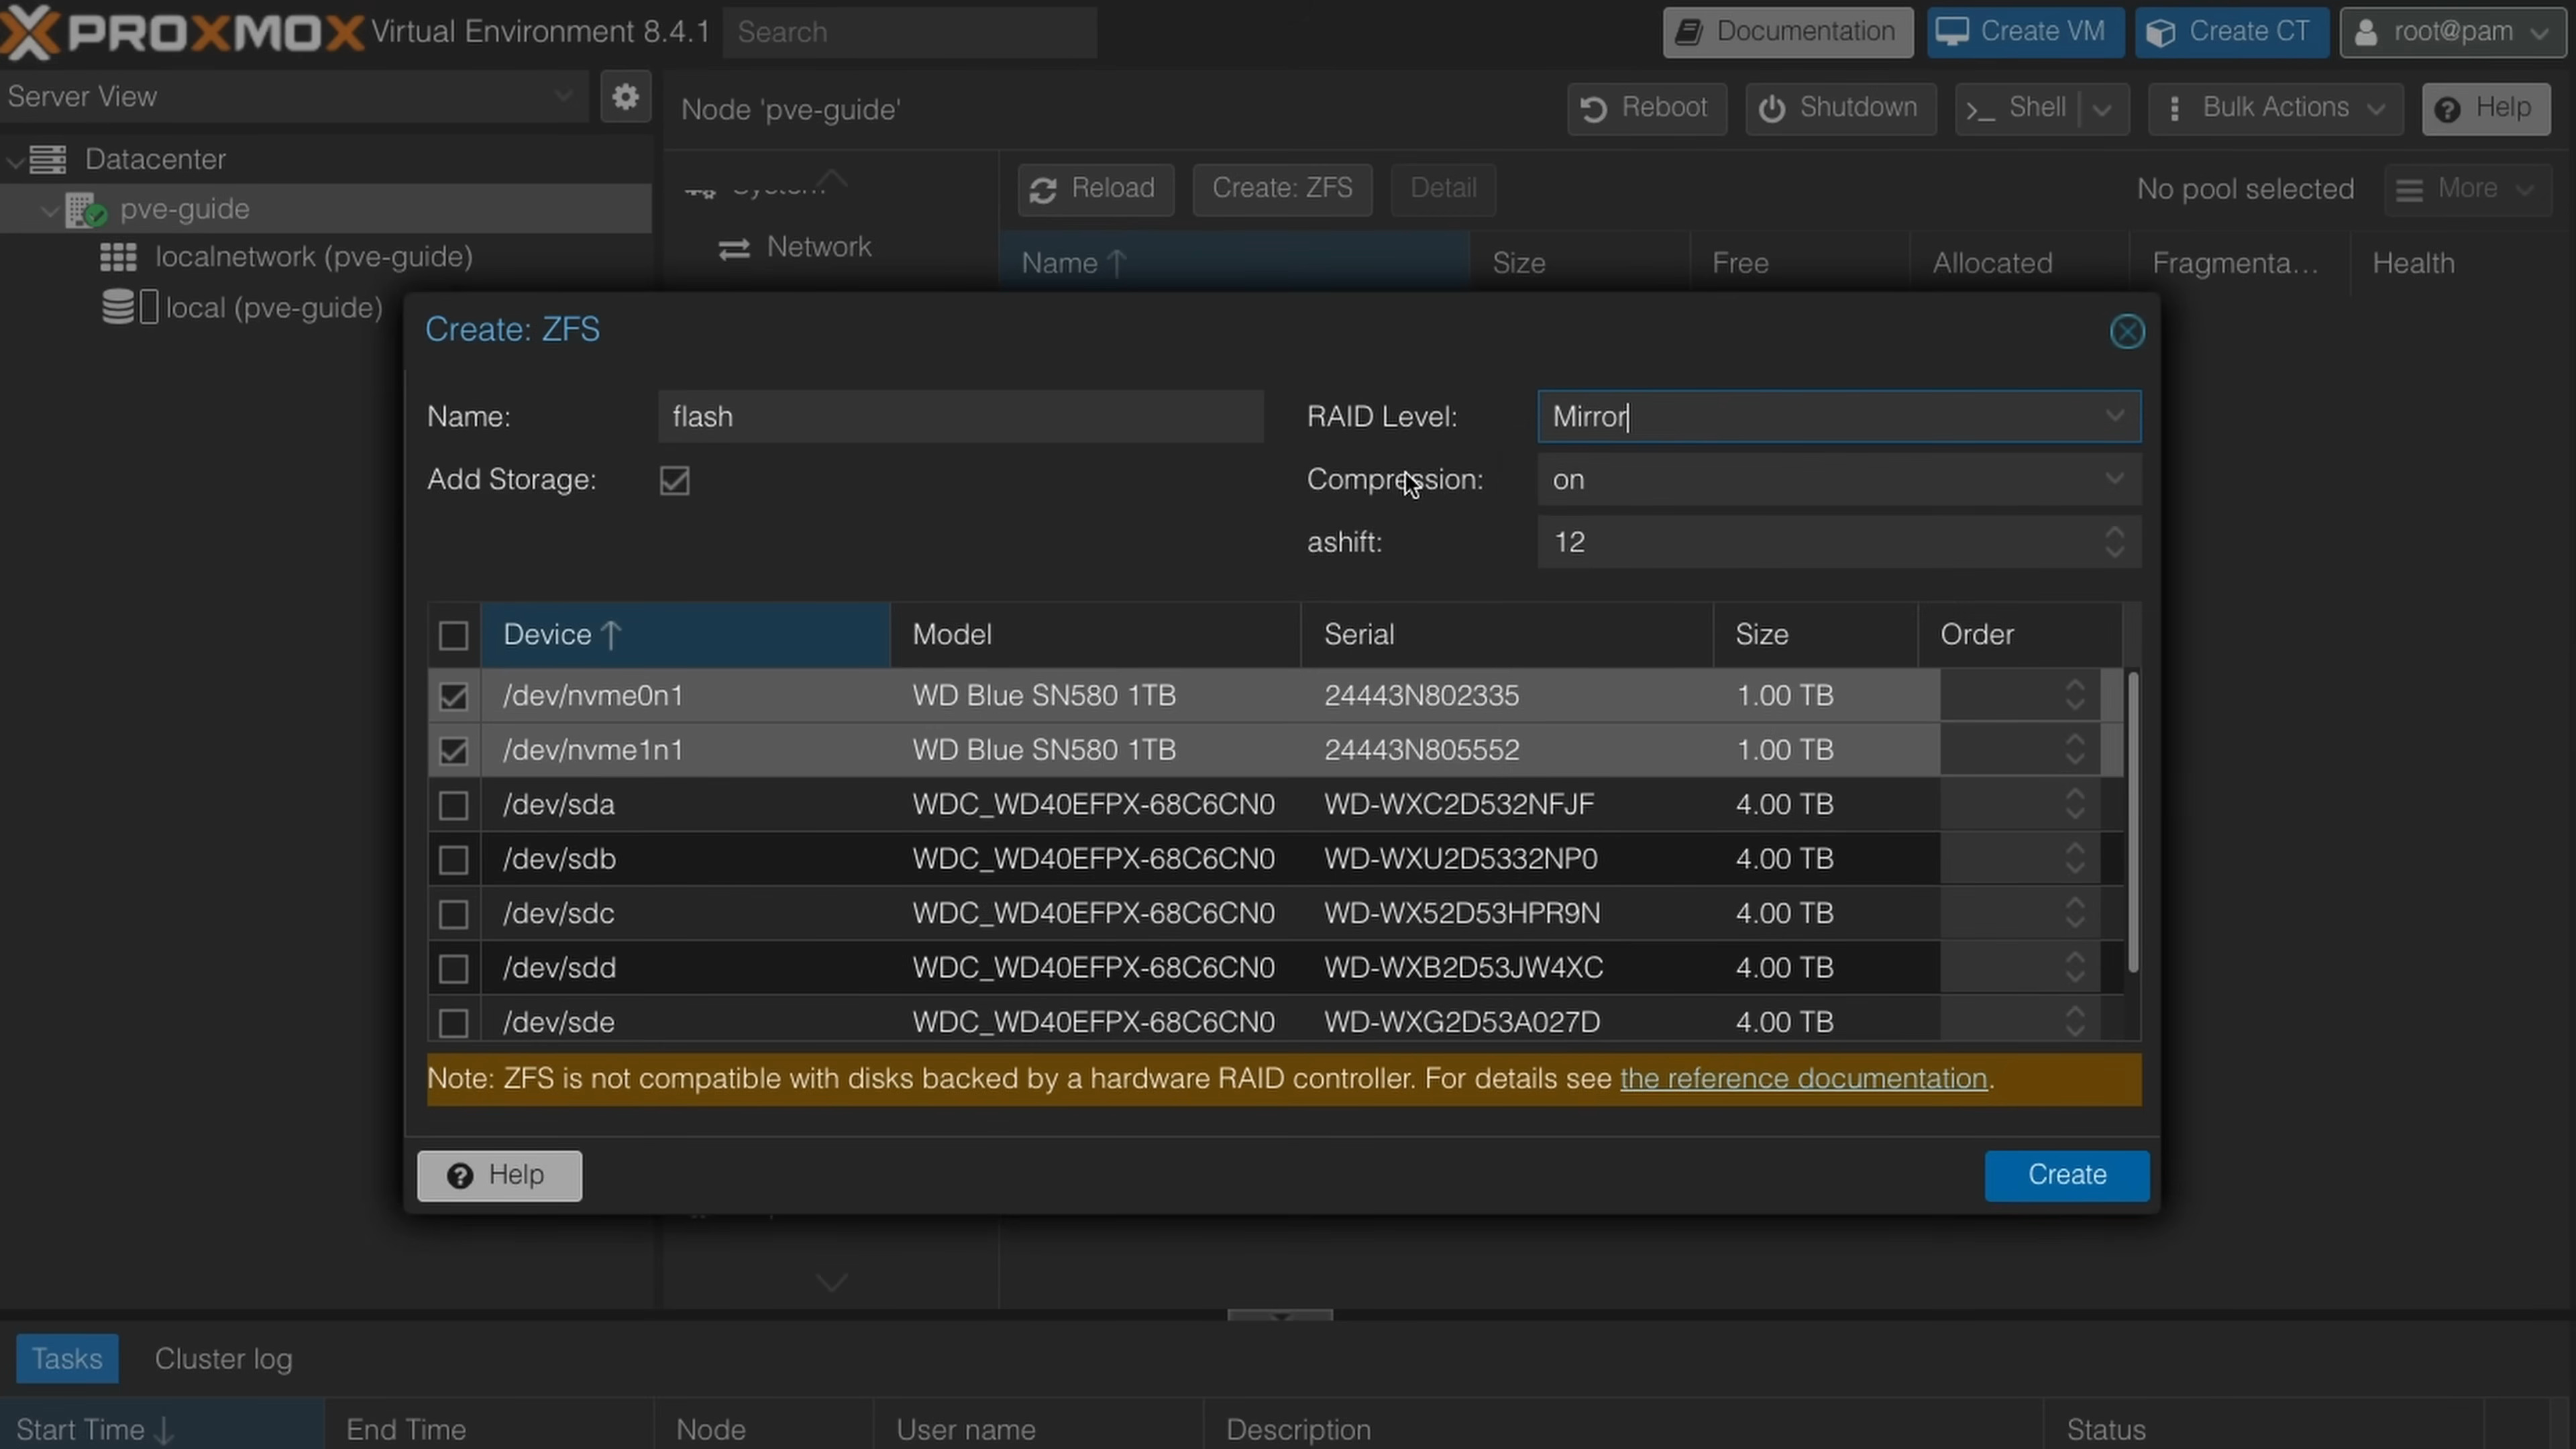
Now, on the Proxmox sidebar for your datacenter, go to Disks > ZFS > Create: ZFS. This will display the screen to create a ZFS pool.
From this screen, it should show all of your drives, so select the ones you want in your pool, and select your RAID level (in the video, I selected mirror since it’s only two drives.) and compression. Make sure you check the box that says Add to Storage. This will make the pools immediately available for use within virtual machines (VM) and containers (LXC).
Create LXC for NetBird
First, we need to download a template for this LXC container. I like to use a slightly older LTS of Ubuntu for added stability. Go to local storage and click on CT Templates. Click the “Templates” button and you’ll see a ton of options, you can pick whatever distro you’re familiar with. I chose Ubuntu 22.04 for this demo.
Container Setup
Once we have a template ready, we can click the “Create CT” button on the top right. Then input all of your settings. If you’re only using this container for NetBird, the required specs will be relatively low and you can always change things in the future.
- General tab:
- Set CT ID (e.g., 100)
- Enter hostname
- Set password or upload SSH key
- Setup as unprivileged
- Template tab:
- Select the downloaded template
- Disks tab:
- Set disk size to 8 GB or higher
- Choose storage location (SSD/NVME storage is best)
- CPU tab:
- Set cores as needed (1-2 cores)
- Memory tab:
- Set memory to 1024 MB (1GB)
- Set swap as desired (512 MB recommended)
- Network tab:
- Configure network interface (usually bridge vmbr0)
- Set IPv4 to DHCP to manage with your router or a static IP.
- DNS tab:
- Configure DNS servers if needed
- Confirm - Review settings and click “Finish”
The container will be created and ready to start. Head into the options for this LXC and enable the start-on-boot option so this container will automatically run if the Proxmox Node reboots.
Enable /dev/tun Passthrough
TUN provides an interface for user applications, such as NetBird, to deal with the raw network traffic. By default, since we set this up as an unprivileged container, there is no access to this interface. To fix this, we will add some lines manually to the configuration for this container. Under your main node, access the shell. Find your container number, for example, mine is 100. Use nano or another text editor to open the configuration.
nano /etc/pve/lxc/100.conf
Now add these lines to the bottom.
lxc.cgroup2.devices.allow: c 10:200 rwm
lxc.mount.entry: /dev/net dev/net none bind,create=dir
lxc.mount.entry: /dev/net/tun dev/net/tun none bind,create=file
Now, restart the container and you can check within the shell for the container to see if the interface is available.
ls /dev/net
Installing NetBird
Before we install NetBird, we are going to want to generate a one-off setup key to use with our LXC installation. While NetBird’s documentation offers comprehensive guidance on this process , let’s quickly review the essential steps:
- Access your NetBird dashboard
- Navigate to the
Setup Keyssection - Click the
Create Setup Keybutton on the right - Name your key (e.g., “ProxmoxLXC”)
- Set an expiration date (recommended for enhanced security)
- Configure auto-assigned groups if needed (e.g., “Homelab”)
- Click
Create Setup Keyto generate the setup key - Copy the generated key and store it securely as you’ll need it for the next steps
Access the shell for your container. You can log in as root and use the password from the initial setup wizard. We are going to need to update our system and install curl so the installation script will work. The command below is for Ubuntu/Debian, change this if needed.
apt update && apt upgrade -y && apt install curl -y
Now that our system is updated, we can install NetBird with the following command.
curl -fsSL https://pkgs.netbird.io/install.sh | sh
Now that NetBird is installed, we can connect our peer to our account using the setup key we generated earlier.
netbird up --setup-key <SETUP KEY>
Now you should see a successful connection message and you’re good to go! Now if you want to access your entire network using this LXC with NetBird, check out the docs to learn more about NetBird Networks!
Need help? Refer to these official guides: